|
Step 1.
Finding the "POST
REPLY" Icon.
-
Locate
the "POST REPLY" icon at the top of the forum
page.
-
See
example on the right -->>
|
 |
|
Step 2.
Finding the "PAPER
CLIP" button.
-
Upon
execution of "step 1" above the following browser window
will popup. It might be difficult to find at first but hang in there
and you will locate it. You must find the "Paper Clip"
icon.
-
See
example on the right -->>
|
 |
|
Step
3.
Finding the "PAPER
CLIP" button continued..
-
Here is
another view to locate the paper clip icon.
-
See
example on the right -->>
|
 |
|
Step 4.
Locating the "Browser..."
button.
-
Upon
oppression of the paper clip icon. You will see yet another browser
window popup. What you want to do here is locate the "Browser"
button icon. This button will enable you to browse your PC
directories and locate the image you want loaded to the POA
servers.
-
See
example on the right -->>
|
 |
|
Step 5.
Finding the "Open"
button.
-
Here you
will locate the "Open" button icon and oppress it. This
window will allow you to browse your PC directories.
-
See
example on the right -->>
|
 |
|
Step 6.
Change file
type to "All File" types.
-
Here you
will change the file type handler to display all file types. When it
first comes up it defaults to only view files with the extension of
"HTML". The image file types will end with jpg or gif. If
you do not change the file type handler then you will never find the
image your looking for.
-
See
example on the right -->>
|
 |
|
Step 7.
Locating your
image.
-
Here you
will switch over or locate your image. This will be up to you to
understand what directory you placed your images into. Use the
"Look in" file handler to maneuver thru your directories
on you PC.
-
Once you
locate your image, highlight it with your mouse and make sure it
gets blocked out. This will indicate you have selected this file for
uploading to the POA server.
-
See
example on the right -->>
|
 |
|
Step 8.
Locating the "Upload
Now!" button.
-
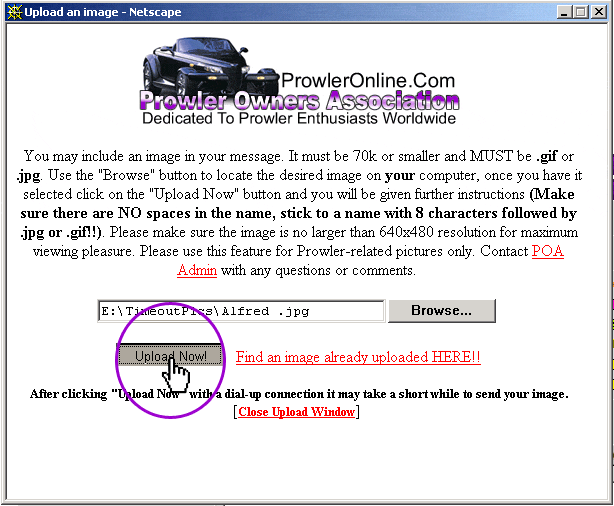
Here your
file has been selected and the absolute path has been recorded. You
now are ready to click on the "Upload Now!" button.
When you do this a copy of your image file will be file transferred
electronically to the POA server.
-
See
example on the right -->>
|
 |
|
Step 9.
Locating the "Upload
Now!" button continued ...
-
Here you
see the button getting oppressed.
-
See
example on the right -->>
|
 |
|
Step 10.
Locating the
image UBB link.
-
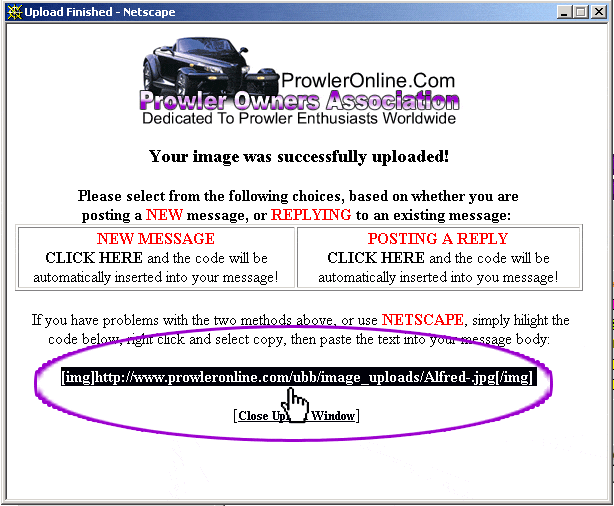
You know
your upload to the POA server has succeeded if you see the window to
the right.
-
See
example on the right -->>
|
 |
|
Step 11.
Highlighting
and copying link.
-
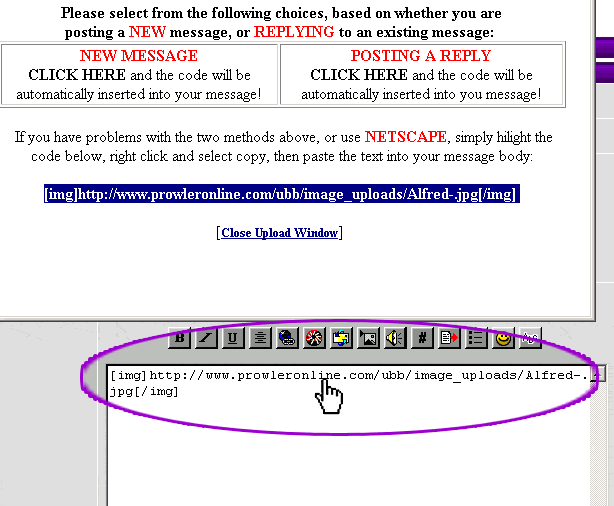
Here you
want to highlight with your mouse the whole UBB link or path that
has generously been provided for you.
-
With your
left mouse button, click/hold and slide from left to right until the
whole link high-lights.
-
See
example on the right -->>
|
 |
|
Step 12.
Copy and
Paste.
-
Here you
will copy and paste the link into your POA post page.
-
All you
do from here is complete your replay or new message text and hit the
"Submit New Topic" button.
-
After
this hit your reload button to refresh your page and you will see
the image.
-
See
example on the right -->>
|
 |


